1. Ascent Loading And Save
This section describes the loading and saving behavior overall of ALS. Loading and Saving game information can be completely independent from Ascent Loading System.
1.1 Project Settings
Ascent Loading and Saving has settings that should be reviewed in each project’s Project Settings (In your project go to Edit -> Project Settings).
Look for AscentLoad&Save on the left
Save Game Class
SaveGame is a standard UE4 class that is meant to assist in identifying what is saved when a save game is triggered. If you want to include more than the basics of ALSSaveGame, create a child Blueprint of ALSSaveGame and modify as needed (I.E. you want to save a user’s created Character Name, Character Customization settings if you’re using a customizable character etc.), then set your class here; otherwise, stick with ALSSaveGame.
On Component Saved Function Name
The function that will be called BEFORE saving that component. Useful to prepare data. THIS FUNCTION IS CALLED BY NAME SO PAY ATTENTION TO THE SIGNATURE!
On Component Loaded Function Name
The function that will be called AFTER loading that component. Useful to prepare data. THIS FUNCTION IS CALLED BY NAME SO PAY ATTENTION TO THE SIGNATURE!
Saves Metadata
Saves Metadata allows you to store metadata related to your save file. This will allow you to create a list of saves with screenshots, names, data etc and present it in a “Load Selected Save” screen.
Screenshots
Sometimes it may be a desire to have a screen shot of the moment the game save occurred and you may want to present it back in your “Load Selected Save” screen. (See Saves MetaData above). The settings here set the height and width of the screenshot saved. More below in “Saving Actors”.
1.2 Saving Actors
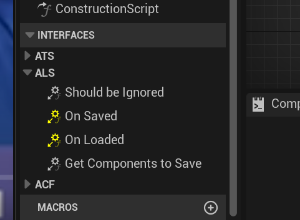
Making an actor part of the standard save is easy. All you need to do is add the ALSSavable Interface to your actor. This interface will create 3 implementable functions OnSaved,OnLoaded and the ShouldBeIgnored. The last one should be used to
These functions are called by the call to SaveGameWorld. All variables on an actor that you want to be saved MUST have the flag “SaveGame” checked. If you don’t see that setting when you select a variable, click the arrow pointing down that shows more settings for that variable.

1.3 Saving Components
To save data in the components attached to an actor, you’d need to implement the GetsComponents to save function from your Interfaces windows and return all the components that needs to be scanned by the game. Inside the component itself, all the variables flagged with “SaveGame” will be saved and Loaded.
1.4 How To Save
Saving can be performed in many ways. You could create a timer that does an auto save, you could have a scripted object in your quest system that calls the save or you can have a “save location”. To save the game world; all you need to do is call “SaveGameWorld”.
Right Click in your desired blueprint and select “Get ALSLoadAndSaveSubsystem”.
From that drag a pin and select Save Game World. It will look like this:
There are a couple options for this.
Slot Name - This is the game save slot name. This will need to be managed by each implementation. An example could be to store the “Save Name” in your game mode and retrieve it from there; however, you are free to manage this how you would like.
Save Screenshot - This tells the system to take a screenshot when the save game occurs. This is stored in the metadata and can be presented back in your load game screen.
Save Game World event call back is a call back so that you can know when the save game is complete. A good example of usage for this would be, when saving, you could present a “saving” icon; then on the call back, you can hide/remove the “saving” icon.
1.5 How To Load
Loading a game save is pretty straight forward, it will restore all of the configured save settings set up by actors, project settings and components to the selected place in time. To load a game save, just Right Click in your desired blueprint and select “Get ALSLoadAndSaveSubsystem”. Pull off the pin and select Load Game World.
All you need to do is set the slot name to load. This function also includes a call back so that you can manage things that may need to occur once the load is complete.