Now we will create a simpel Widget, which Displays following:
Health (Red Bar)
Health with Potion (Light Red Bar inside Health Bar)
Mana (Blue Bar)
Mana with Potion (Light Blue Bar inside Mana Bar)
Stamina (Yellow Bar)
Stamina with Potion (Light Yellow Bar inside Stamina Bar)
Level (As Number)
XP (Black Bar)

1. First of all we need to add all Stats and Custom Stats, as well setup the Level.
Look into those Tutorials:
I will create everything like in the Tutorial.
For Stamina i will use the Gameplay Tag Stats.Secondary.Stamina.
2. Now we will create a new Widget and add following to it:
Overlay with 2 Progress Bars on top of each other.
The first one will be the Health Bar with Potion - Make the Fill Color light red
The second one, which should be on top of the first one, is going to be the Health Bar - Make it red.
Do the same with the Mana and Stamina Bar, just in the correct Colors.
Create a Text Widget for the Level.
Create another Progress Bar for the Level and make the Fill Color Black.
If you are not sure how to set this up, you can look inside the SP8_WBP_CustomStatsAndLevel Widget, which can be found inside the Directory RPG_Essentials / Example / Widgets.
3. Switch to the Event Graph and create following Functions
Dispatcher_XP_Changed: Will be called, if the XP of the Player changes.
Dispatcher_LevelChanged: Will be called, if the Level of the Player changes.
Dispatcher_CustomStatChanged: Will be called, if a Custom Stat changes.
Dispatcher_CustomStatWithPotionChanged: Will be called, if a Custom Stat with Potion changes.
Also add a new Variable called StatComponent and set the Type to SP8_StatComponent.
[Optional] Go to Class Defaults and set the Visiblity to Hidden, so it will not be displayed at the start and will show up, if we initialize the Widget.
4. We will start with the Function Dispatcher_XP_Changed:
The Input should contain following Variables:
CurrentXP [Integer]: What’s the current XP of the Player.
MaxXP [Integer]: What’s the XP needed for the next Level.
Inside the Function, we have to check if the current XP is bigger then 0.
If yes, we can devide the Current XP with the Max XP and call the Function SetPercent on the XP Bar. In Percent can be set with the Value from the deviding.
To make the divide output pin to float, do a right click on it and click To Float.
If no, we can simple set the Function SetPercent on the XP Bar to 0.

If this Function is going to be called, the XP Bar should be setting it’s Value to the correct Percentage.
For example if the Current XP is 100 and the Max XP is 1000, the Bar will be filled by 10%.
5. The next Function will be Dispatcher_LevelChanged:
The Input should contain Level [Integer]: Will be the current Level of the Player.
Inside the Function we can simple call SetText on the Level Text Widget and connect the Level with the InText Variable.

If this Function is going to be called, the Level Text will Display the current Level.
6. And the next will be Dispatcher_CustomStatChanged and Dispatcher_CustomStatWithPotionChanged.
In Both functions we will do almost the same:
As Input we need following:
With Potion: Stat Type [Gameplay Tag]
Without Potion: Stat Type [Gameplay Tag] and Adding Value [Integer]
First of all we need to get the current Custom Stat Value:
With Potion: Call getCurrentCustomStatWithPotion on the Stat Component with our Input Stat Type.
Without Potion: Call getCurrentCustomStat on the Stat Component with out Input Stat Type.
Set the output of both Functions to a new local Variable called local_value.
Then we need to make a switch on the Stat Type and set for each Stat our Bar (new local variable called local_bar)
For Stats.Secondary.Mana put the Mana Bar (With Potion: Mana with Potion Bar).
Set all other Stats as well.
Like in the Dispatcher_XP_Changed, we need to check now, if our local_value is greater then 0.
If yes, call GetStatValue on the Stat Component and divide the local_value with the returned value. Again call SetPercent on the local_bar, with the new Value.
If no, just put 0 into SetPercent.
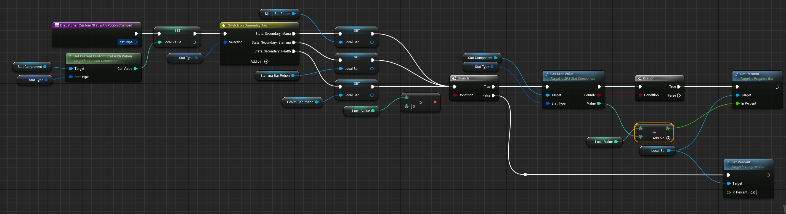

If this Function will be called, the Custom Stat Bar will set the correct Value like the XP Bar.
7. Now we need to set everything on start.
I created the Event Initialized with the Input Stat Component.
First of all i will set the Stat Component Variable which we created earlier.
After that we have to call following Functions:
Dispatcher_CustomStatWithPotionChanged for each Custom Stat.
Dispatcher_CustomStatChanged for each Custom Stat.
Dispatcher_LevelChanged and as input we need to call getLevel on the Stat Component.
Dispatcher_XP_Changed and as input we need to call getMaxXP and getXP on the Stat Component.
[Optional] If the Widget is hidden, we want now to show it with the Function SetVisiblity.
At the end we need to Bind all Events to the Functions we have created. Bind now those Events from Stat Component to your Widget:
CurrentCustomStatChanged
Call create Event and set the Function to Dispatcher_CustomStatChanged.
CurrentCustomStatWithPotionChanged
Call create Event and set the Function to Dispatcher_CustomStatWithPotionChanged.
XPChanged
Call create Event and set the Function to Dispatcher_XP_Changed.
CurrentLevelChanged
Call create Event and set the Function to Dispatcher_LevelChanged.


The Event Initialized should be called, when the Stat Component was already initialized.
If you would call it before, you will get wrong Values.