This section of the Motion Symphony 2.0 Update manual goes over some of the new features available and how to get started using them. Note that this section may not be comprehensive and complete documentation will be made available following full release with UE5.3.
Match Features
For the initial release of Motion Symphony 2.0 there are twelve match features available for use. Most of them are self-explanatory, however, this section will go over each match feature and their relevant settings for clarity.
Match Feature Trajectory 2D
The Trajectory 2D match feature is your standard motion matching trajectory feature and it operates the same way as the fixed trajectory in motion symphony 1.0. This feature should only be used as an ‘Input Response’ and never as a ‘Pose Quality’ feature. The settings are as follows:
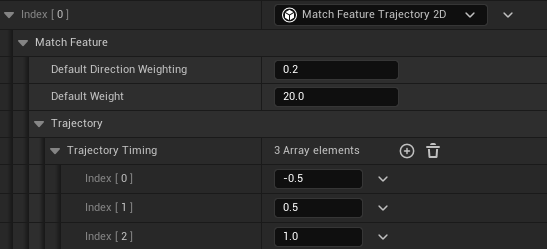
Default Directional Weighting - The weighting of the facing angle or directional aspect of the trajectory
Default Weight - The weight of the trajectory positions. It is recommended for this to be much higher than directional weighting.
Trajectory Timing - A list of trajectory point times. These values must be in order from minimum to maximum and there must be at least 1 point in the past (negative) and 1 point in the future (positive). The example below shows a 3-point trajectory with a point 0.5seconds in the past and 2 points in the future spaced in 0.5s intervals.
Match Feature Trajectory 3D
Identical to the 2D version except that it also matches the ‘Z’ axis of the trajectory if there is any ‘Z’ axis movement. It is not recommended to use this match feature unless you have very specific use case for the Z axis of the trajectory.
Match Feature Distance
This is the match feature used for distance matching as a Match Feature. Please see the section on this page on ‘Distance Matching as a Match Feature for details on how to use this. Note that this match feature should only be used as an ‘Input Response’ and never as a ‘Pose Quality’ feature.
Match Feature Body Momentum 2D
This feature is for matching the character’s current velocity, essentially helping it to maintain momentum (hence the name). While this feature may be unfamiliar to MS1.0 users, it was built into MS1.0 under the hood and so is a standard motion matching feature that should be considered for any configuration.
Match Feature Body Momentum 3D
Identical to the 2D version but with consideration for the vertical ‘Z’ axis.
Match Feature Body Momentum Rot
This feature is the same concept as ‘Match Feature Body Momentum’ except that it considers rotational yaw velocity and it helps with turns like 180 plants and curve type animations. This feature was also built into MS1.0 and so is highly recommended to be included in every motion configuration.
Match Feature Bone Location
This feature matches the location of a bone in component space and is the bread and butter of pose matching. It allows for matching bone location independently of bone velocity. This may be desirable for some extra bones beyond the standard foot matching without having a major performance impact. In MS 1.0 it was not possible to match bone location without also matching its velocity.
To configure this feature, simply choose the bone you would like to match:

Match Feature Bone Velocity
The ‘Bone Velocity’ match feature enables matching of a bone’s velocity in component space independently of the bone location. Matching bone velocity helps ensure animation flows in a forward direction and prevents things like backward run cycles. Just like with the ‘Bone Location’ match feature, simply choose which bone to match velocity in it’s configuration.
Match Feature Bone Location and Velocity
More often than not, bone location and velocity are used together. Therefore, this match feature nicely packages these two match features together for ease of use and performance.
Match Feature Bone Facing
Matches the facing direction of a bone. This can be very useful in cases where mirrored animations may appear similar to the cost function but in fact are quite different. A good example of this is a strafe type animation where the lower body turns to run backward but the upper body is twisted to face somewhat forward. When only the feet are matched the cost function can easily confuse between this animation and its mirrored counterpart. Matching the facing of an upper spine bone could prevent this confusion.
Match Feature Bone Height
Matches the height of a bone in component space. An example use case of this is to match the height of the hip bone to differentiate between different postures. In such a case only the component space height of the bone is useful and therefore matching the full bone location is inefficient and over complicates things.
Match Feature Bone Axis
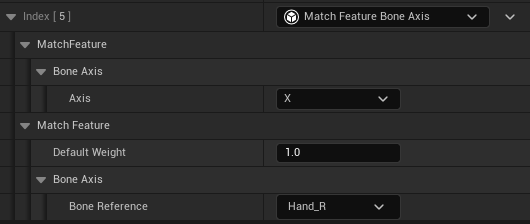
Similar to the bone height feature but allows matching of a specified axis instead of being limited to the ‘Z’ axis.
Distance Matching as a Match Feature
Distance Matching Configuration
With Motion Symphony 2.0 it is now possible to use distance matching as a metric for motion matching animation selection. To do so you will need to add the ‘Distance’ match feature to the ‘Input Response Features’ list on your Motion Config. This is in the same list as you would have your trajectory match feature as distance matching is an external input. Note that you need a separate match feature for each different distance match case you would like to use. For example, in the below image, two distance matching features have been added, one for starts and one for stops.
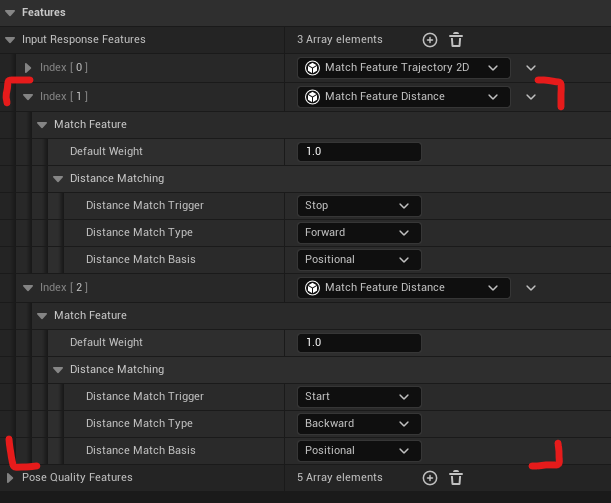
The settings for these match features are as follows:
Distance Match Trigger: What is intended to trigger the use of this distance matching feature. This is essentially an identifier that the system uses to differentiate between different distance matching cases.
Distance Match Type: The type or direction of distance matching:
Forward - Match to a point in the future (usually used for stops as it is an event that occurs forward in the future)
Backward - Match to a point in the past (usually used for starts as it is an event that occurs backward in the past)
Both - Match both forward and backward (usually used for plants or the peak of a jump)
Distance Match Basis: How the distance should be measured
Positional - Distance will be measured with Euclidean distance to the distance marker.
Rotational - Distance measured as a rotational angle.
Distance Matching Tags
In order to pre-process distance matching data for the distance ‘match features’, it is necessary to mark distance matching ‘points of interest’ on the Motion Data timeline in order to pre-process distance matching data. To do this, simply add distance matching tags to the Motion Data timeline where relevant and configure them. The image below shows an example of a distance matching tag setup for a ‘start’ distance match feature.
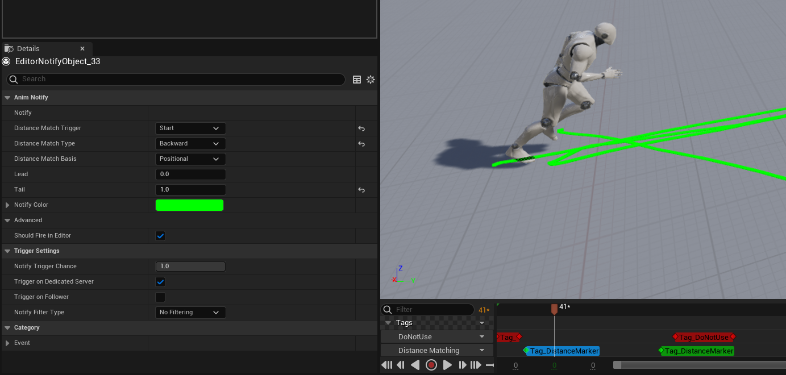
It is essential to configure each tag appropriately. The ‘trigger’, ‘type’ and ‘basis’ settings on a tag are used to determine which match feature they relate to so it is essential they are configured correctly. There are two additional settings which determine the ‘reach’ or influence of these tags:
Lead - How much lead time before the tag (in seconds) that animation poses should pre-process distance matching data. Lead is only relevant to tags with ‘forward’ or ‘both’ set as the distance match basis. In the example of a stop animation, you want this lead time to be equal to the full length of the stopping animation (1 second is a good starting point)
Tail - Just like the lead, the tail determines the future influence of a tag, defining how far into the future distance matching data should be processed for this tag. Tail is only relevant to tags with ‘backward’ or ‘both’ set as the distance match basis.
Distance Matching Component
Just like the trajectory match feature, the distance match feature needs a method of injecting the distance matching data into the motion matching node. To do this you will need to add a ‘Distance Matching Component’ to your character. You can either set it to ‘Automatic’ triggers or trigger the distance matching events manually via blueprint.
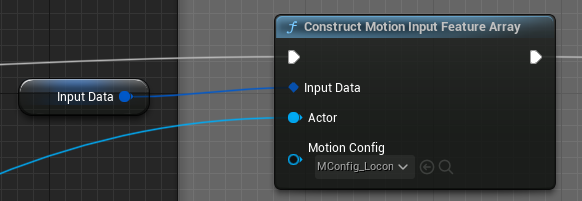
If setup correctly, the distance matching data will automatically be extracted via the same ‘Construct Motion Input Feature Array’ function used to extract the trajectory in the animation blueprint.
Next Naturals
Next naturals are essentially the poses that naturally come next in any given animation. Think of them as the poses within the next second or so of animation from your current pose. In some cases, it is desirable for these animation poses to only be played if the previous section of animation was played. For example, it may be desirable to only play the latter half of a 180 plant animation if the first half has already been chosen. In such a case these poses may be marked as ‘next natural’ and so that it is only possible for them to be chosen if they naturally come next from the current animation.
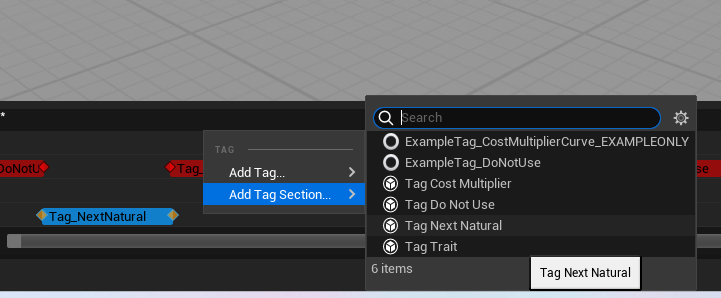
Users can mark next naturals with tags in the Motion Data editor timeline as shown below:
There are also some settings for Next Naturals on the Motion Matching node itself which are worth paying attention to as follows:

Next Natural Range: How far into the future of the current pose (in seconds), next naturals should be considered.
Next Natural Tolerance Test: Much like the next pose tolerance test, if a next natural is a ‘close enough’ match then the entire search can be skipped. Check this box to turn this feature on. Note that this feature uses the settings under the ‘Pose Tolerance Test’ foldout to determine if the next natural is ‘close enough’. Be careful with this setting as using it too aggressively can cause animation to lock up and be un-responsive.
Favour Next Natural: Next naturals can be given a favour or cost multiplier to make them more likely to be chosen. This can help with stability of animation. Checking this box will turn on next natural favouring.
Next Natural Favour: The cost multiplier to apply for next natural favouring if it is on. Values below 1.0 make the next natural more likely to be chosen. Don’t set this value too low as it can cause the animation to get stuck or be very un-responsive.
AI Nav Path Trajectory Generator
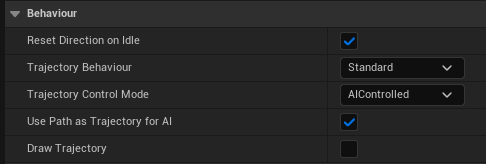
The trajectory generator has been updated with an option to extract the trajectory from the navigation path. To do so, set the ‘Trajectory Control Mode’ option on the Trajectory Generator component to ‘AIControlled’ and set the ‘Use Path as Trajectory for AI’ option to true as shown below:
